
Capture2Text enables users to quickly OCR a portion of the screen using a keyboard shortcut. The resulting text will be saved to the clipboard by default.
Conceptual illustration:

Capture2Text is free and licensed under the terms of the GNU General Public License.
The latest version can be found on the Capture2Text download page hosted by SourceForge.
Supported operating systems:
Note: Windows XP support has been dropped as of Capture2Text v4.0.
By default Capture2Text comes packaged with the following languages: English, French, German, Japanese, Korean, Russian, and Spanish.
Follow these steps if you would like to install additional OCR languages:
The following OCR languages are supported:
| Afrikaans (afr) | Greek (ell) | Odiya (ori) |
| Albanian (sqi) | Gujarati (guj) | Panjabi (pan) |
| Amharic (amh) | Haitian (hat) | Persian (fas) |
| Ancient Greek (grc) | Hebrew (heb) | Polish (pol) |
| Arabic (ara) | Hindi (hin) | Portuguese (por) |
| Assamese (asm) | Hungarian (hun) | Pushto (pus) |
| Azerbaijani (aze) | Icelandic (isl) | Romanian (ron) |
| Basque (eus) | Indic (inc) | Russian (rus) |
| Belarusian (bel) | Indonesian (ind) | Sanskrit (san) |
| Bengali (ben) | Inuktitut (iku) | Serbian (srp) |
| Bosnian (bos) | Irish (gle) | Sinhala (sin) |
| Bulgarian (bul) | Italian (ita) | Slovak (slk) |
| Burmese (mya) | Japanese (jpn) | Slovenian (slv) |
| Catalan (cat) | Javanese (jav) | Spanish (spa) |
| Cebuano (ceb) | Kannada (kan) | Swahili (swa) |
| Central Khmer (khm) | Kazakh (kaz) | Swedish (swe) |
| Cherokee (chr) | Kirghiz (kir) | Syriac (syr) |
| Chinese - Simplified (chi_sim) | Korean (kor) | Tagalog (tgl) |
| Chinese - Traditional (chi_tra) | Kurukh (kru) | Tajik (tgk) |
| Croatian (hrv) | Lao (lao) | Tamil (tam) |
| Czech (ces) | Latin (lat) | Telugu (tel) |
| Danish (dan) | Latvian (lav) | Thai (tha) |
| Dutch (nld) | Lithuanian (lit) | Tibetan (bod) |
| Dzongkha (dzo) | Macedonian (mkd) | Tigrinya (tir) |
| English (eng) | Malay (msa) | Turkish (tur) |
| Esperanto (epo) | Malayalam (mal) | Uighur (uig) |
| Estonian (est) | Maltese (mlt) | Ukrainian (ukr) |
| Finnish (fin) | Marathi (mar) | Urdu (urd) |
| Frankish (frk) | Math/Equations (equ) | Uzbek (uzb) |
| French (fra) | Middle English (1100-1500) (enm) | Vietnamese (vie) |
| Galician (glg) | Middle French (1400-1600) (frm) | Welsh (cym) |
| Georgian (kat) | Nepali (nep) | Yiddish (yid) |
| German (deu) | Norwegian (nor) |
Follow these steps to perform a standard OCR capture using the capture box:

As with all OCR captures, you must manually select the language that you would like to OCR from the settings.
To change the OCR language, right-click the Capture2Text tray icon, select the OCR Language option and then select the desired language.
To quickly switch between 3 languages, use the OCR language quick access keys: Windows Key + 1, Windows Key + 2, and Windows Key + 3. The quick access languages may be specified in the settings.
When Chinese or Japanese is selected, you should specify the text direction (vertical/horizontal/auto) using the text direction hotkey: Windows Key + O. If auto is selected, horizontal will be used when the capture width is more than twice the height, otherwise vertical will be used. The text direction also affects how furigana is stripped from Japanese text.
(For Japanese) Capture2Text will attempt to automatically strip out furigana.
Capture2Text can automatically capture the line of text that is closest to the mouse pointer.
Follow these steps to perform a Text Line OCR Capture:
Example:

Capture2Text can automatically capture the line of text starting at the character that is closest to the mouse pointer and working forward.
Follow these steps to perform a Forward Text Line OCR Capture:
Example:

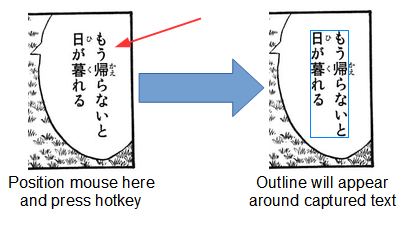
Capture2Text can automatically capture text contained within a comic book speech/thought bubble as long as the bubble is completely enclosed.
Follow these steps to perform a Bubble OCR Capture:
Example:
To specify the active OCR language, right-click the tray icon, click on OCR Language, and select an OCR languages from the list:

To enable the translation feature, start by opening the settings dialog (right-click tray icon and select "Settings..."), and clicking on the Translate tab.
![]()
![]()
Each installed OCR language may be translated to a different language.
Note 1: Some OCR languages do not have translation support. Unsupported languages will not be displayed.
Note 2: The translation feature requires Internet access.
Right-click the Capture2Text tray icon in the bottom-right of your screen and then select the "Settings..." option to bring up the Settings dialog. You may hover over many of the option labels to display a helpful tooltip explaining the option.


The Hotkeys tab allows you to specify which key and modifiers to use for each hotkey. To disable a hotkey, select "<Unmapped>" from the drop-down list.

Current OCR language: Specify the active OCR language to use. You may also specify the active OCR language in the tray icon menu.
Quick-Access Languages: The languages to use for each of the quick-access language hotkeys.
Whitelist: Inform the OCR engine that the captured text will only contain the provided characters.
Blacklist: Inform the OCR engine that the captured text will never contain the provided characters.
Text Orientation: The orientation of the text that will be captured. This option is only used when Chinese or Japanese is set as the active OCR language. If Auto is selected, horizontal will be used when the capture width is more than twice the height, otherwise vertical will be used. The text direction also affects how furigana is stripped from Japanese text. You may also specify the text orientation in the tray icon menu or with the Text Orientation hotkey.
Tesseract Config File: An advanced feature that allows you to specify a Tesseract config file.
Trim Capture: During OCR preprocessing, trim captured image to foreground pixels and add a thin border. OCR accuracy will be more consistent and may even be improved.
Deskew Capture: During OCR preprocessing, attempt to compensate for slanted text found in an OCR capture.

Contains options for configuring the automatic captures. Hover over the option labels for more information.

Allows you to specify the colors of the OCR Capture Box. The transparency can be changed by adjusting the "Alpha channel" value in the color selection dialog.

Allows you to specify the preview position, color, and font. You may disable the preview by unchecking the "Show Preview Box" checkbox.

Save to clipboard: Save the captured OCR text to the clipboard.
Show popup window: Show the captured OCR text in a popup window:

Keep line breaks: Check this option if you don't want carriage returns and line feeds to be stripped from the captured text.
Logging: Allows you to save all captures to the specified file in the specified format. The following tokens may be used in the format: ${capture}, ${translation}, ${timestamp}, ${linebreak}, ${tab}. The default format is: "${capture}${linebreak}".
Call Executable: An advanced feature that allows you call an executable after OCR is complete. The following tokens may be used: ${capture}, ${translation}, ${timestamp}. Example:
C:\Anaconda3\python.exe "C:\Scripts\test.py" "${capture}" "${translation}"

Allows you to perform text replacements. Supports regular expressions. The text on the left will be replaced with the text on the right. Different replacements may be specified for each OCR language.
See the translation section.

This page allow you to enable the text-to-speech feature, set the volume, and select the options (voice, rate, pitch) to use for each OCR langauge.
Enable Text-to-speech: Enable text-to-speech when text is captured.
When this option is checked and the voice is not set to "<Disabled>", the "Say" button will appear in the popup dialog:

Volume: Master volume of the text-to-speech feature. Applies to all languages.
OCR Language: Specify speech options for the selected OCR language.
Preview: Preview the current rate, pitch, and voice.
Usage: Capture2Text_CLI.exe [options]
Capture2Text may be used to OCR image files or part of the screen.
Examples:
  Capture2Text_CLI.exe --screen-rect "400 200 600 300"
  Capture2Text_CLI.exe --vertical -l "Chinese - Simplified" -i img1.png
  Capture2Text_CLI.exe -i img1.png -i img2.jpg -o result.txt
  Capture2Text_CLI.exe -l Japanese -f "C:\Temp\image_files.txt"
  Capture2Text_CLI.exe --show-languages

Options:
  -?, -h, --help                     Displays this help.
  -v, --version                      Displays version information.
  -b, --line-breaks                  Do not remove line breaks from OCR text.
  -d, --debug                        Output captured image and pre-processed
                                     image for debugging purposes.
  --debug-timestamp                  Append timestamp to debug images when
                                     using the -d option.
  -f, --images-file <file>           File that contains paths of image files to
                                     OCR. One path per line.
  -i, --image <file>                 Image file to OCR. You may OCR multiple
                                     image files like so: "-i <img1> -i <img2>
                                     -i <img3>"
  -l, --language <language>          OCR language to use. Case-sensitive.
                                     Default is "English". Use the
                                     --show-languages option to list installed
                                     OCR languages.
  -o, --output-file <file>           Output OCR text to this file. If not
                                     specified, stdout will be used.
  --output-file-append               Append to file when using the -o option.
  -s, --screen-rect <"x1 y1 x2 y2">  Coordinates of rectangle that defines area
                                     of screen to OCR.
  -t, --vertical                     OCR vertical text. If not specified,
                                     horizontal text is assumed.
  -w, --show-languages               Show installed languages that may be used
                                     with the "--language" option.
  --output-format <format>           Format to use when outputting OCR text.
                                     You may use these tokens:
                                     ${capture}   : OCR Text.
                                     ${linebreak} : Line break (\r\n).
                                     ${tab}       : Tab character.
                                     ${timestamp} : Time that screen or each
                                     file was processed.
                                     ${file}      : File that was processed or
                                     screen rect.
                                     Default format is "${capture}${linebreak}".
  --whitelist <characters>           Only recognize the provided characters.
                                     Example: "0123456789".
  --blacklist <characters>           Do not recognize the provided characters.
                                     Example: "0123456789".
  --clipboard                        Output OCR text to the clipboard.
  --trim-capture                     During OCR preprocessing, trim captured
                                     image to foreground pixels and add a thin
                                     border.
  --deskew                           During OCR preprocessing, attempt to
                                     compensate for slanted text.
  --scale-factor <factor>            Scale factor to use during pre-processing.
                                     Range: [0.71, 5.0]. Default is 3.5.
  --tess-config-file <file>          (Advanced) Path to Tesseract configuration
                                     file.

------

For Capture2Text.exe (as opposed to Capture2Text_CLI.exe), you may specify an additional option:
  --portable                         Store .ini settings file in same directory
                                     as the .exe file.
Solution: Install the Visual Studio 2015 redistributable.
Possible solutions:
Make sure that you have unzipped Capture2Text. Search Google if you do not know how to unzip a file.
Make sure that your Anti-virus software is not blocking Capture2Text. Refer to the documentation that was bundled with your Anti-virus software.
Make sure that you have downloaded the latest version from SourceForge.
Restart your computer.
Ask one of your grandchildren to help you :)
Great! Create a ticket and describe the bug.
Great! Create a ticket and describe your suggestion.
Solution: Specify the correct OCR language.
Click the "Show hidden icons" button (it looks like a triangle or a ^ character).
Right-click it instead.
Capture2Text is a Windows-only software. If you have a technical background, feel free to port it (but don't ask me to help).
There isn't one. Capture2Text doesn't have an installer either. To remove Capture2Text from your computer, simply delete the Capture2Text directory.
Type "%appdata%\Capture2Text" into Windows Explorer.
You may delete it to restore default settings.
Call Capture2Text.exe using the --portable option. You may want to create a shortcut for this. Setting this option will make Capture2Text store the .ini settings file in same directory as Capture2Text.exe (as opposed to "%appdata%\Capture2Text" which is the normal location).
The source code is located on SourceForge.
Automatically lookup Japanese words that you have OCR'd with Capture2Text. Supports de-inflected expressions, readings, audio pronunciation, example sentences, pitch accent, word frequency, kanji information, and grammar analysis. Supports both EDICT and EPWING dictionaries.
Free and open source Manga reader android app that allows you to quickly OCR and lookup Japanese words in real-time. There are no ads and no mysterious network permissions. Supports both EDICT and EPWING dictionaries.